== Love Photography == Delight in Light ==

Wednesday 18 July 2007

Grinning Baby

Baby Smile

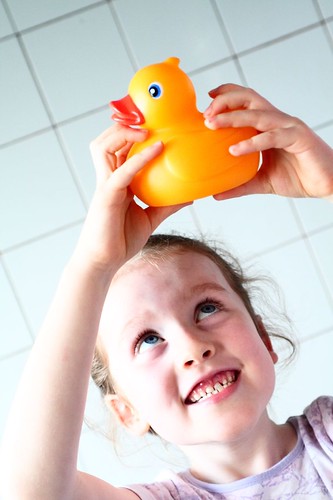
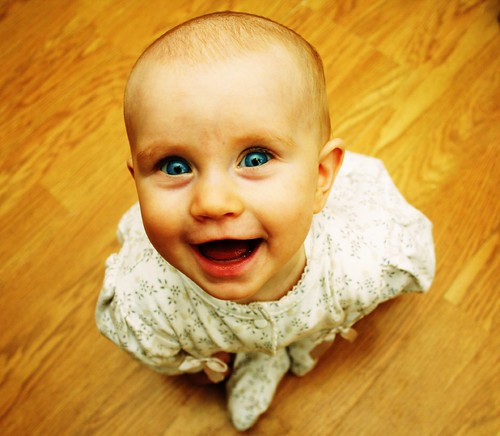
This is a photo of my youngest daughter taken a little while ago. She is actually sitting on the floor - although her legs were a bit obscured by the fact that she was leaning forward so it does look more like she was standing!

Here's a quick summary of how I did it:

  • I was wanting a high viewpoint, so I popped my her on the floor (she could sit but not crawl at that stage - ideal for this sort of thing!) and, using a wide-angle lens, took a few photos of her from close above her head. I played a kind of "peek-a-boo" game with the camera to get the giggles.
  • The lighting was very simple - just an on-camera flash (strobe) rotated around so that the light bounced off the ceiling (if you view the large version of the photo on Flickr you can just about see the reflection of the camera and flash in her eyes).
  • I selected the best image and adjusted it in Photoshop as follows:
    • I used a curves adjustment layer to get the colour effect. I wanted a fairly high-contrast kind of look, so I started off by adjusting each of the RGB curves so that the curve slope for that was steepest in the zones corresponding to the main detail in the photo. Then I played around with the curves a bit more until I got an overall colour cast that I liked.
    • I made a selection of the blue part of the eyes (from the original photo), enhanced the blue colour a bit (again using curves), and then superimposed them over the rest of image to get the blue of her eyes to really stand out.

Thursday 12 July 2007

Me & My Ducky

Hello Duckie

This is a photo of my daughter dancing around with a rubber ducky. I wanted to have a dynamic composition (to match her rather manic expression!), so I placed her head low in the frame and held the camera at an angle (as you can tell from the wall tiles).

The lighting for the photo was simply window light from the bathroom window. Post processing involved playing around with curves and contrast a little in the RAW processing software that came with the camera (Canon Digital Photo Professional [DPP]).

Tuesday 10 July 2007

Rule of Thirds

The "rule of thirds" is probably one of the most often quoted compositional "rules" in photography (probably because it's got a convenient name - the others don't really seem to have names). It says that rather than placing your subject in the centre of the frame you should divide your frame up into thirds vertically and horizontally like this:

Rule of Thirds

Then you should position your subject (or subjects) either at the intersections (like the blue circle in this illustration), or along the vertical or horizontal lines (like the blue line in this illustration). So, according to this rule, for example, the picture below on the left is better than the one on the right:

Bottles 2 Bottles 1

Now, this "rule" is the subject of much derision, with many people expounding the fact that using the rule of thirds is not a guarantee of success - and of course, they are right - there are no hard and fast rules in art.

However, it is based on a good principle - don't just point your camera at something and "shoot" it (that's what you do in marksmanship, not photography) - rather think about where the subject should be in the frame so that it looks most interesting. Then if you place the subject smack in the middle of the frame, it's because you wanted to, not just because you didn't think about it.

Remember, your camera is an artist's tool - not a weapon.

Monday 11 June 2007

Can You Tell What It Is Yet?

Speed

This photo was really the result of two experiments - the first experiment was to set up a camera on a tripod in my car (facing out of the front window) so that I could take a slow-shutter speed picture at night as I drove along. I can't remember exactly what the shutter speed actually was, but it was quite dark and the ISO was quite low, so I ended up with quite a dramatic result in spite of the fact that I was actually driving quite slowly at the time.

The second stage in this image's life came some time later when I was experimenting with curves in Photoshop - I happened to choose this photo to play with and I applied some rather radical curves to it so that all the colours did weird things - like the dark black areas turning that deep red colour.

A bit of fun on two separate occasions, but I quite enjoy the final outcome - just shows that a little experimentation can be good for the creativity occasionally!

Monday 28 May 2007

Sleeping Child

Sleeping Child

This is photo that I took for a competition with the theme "close-up". I didn't have a digital camera of my own at the time (to speak of), so I took the photo with an Olympus digital camera that I borrowed from a brother-in-law. I converted the photo to black & white by playing around with various channels - mostly it came from the K channel in CMYK mode with a bit of the other channels mixed in to avoid the completely blank areas that you get with the K channel by itself. The detail in the photo was a little soft for my liking, so used the pen tool in two ways to help to improve it a little:

  • I used the pen to create masks along some of the lines that needed to be sharpened up a little (for example along the eyelids, nostrils, etc.). Ironically the masks needed to be blurred a little (with the blur brush) because the lines directly from the pen tools were a bit too sharp on their own. I used the resulting masks to sharpen things up a little by lightening / darkening along the edge of the mask as appropriate.
  • I draw paths along each of the eye-lashes (ok, so I had too much time on our hands!) and stroked the paths with a black brush using simulated pressure. This resulted in reasonably realistic, sharp lashes which were a significant improvement on the originals which were a bit too blurred and grainy for my liking (although, again, I had to reintroduce some blurring in places to soften them back down a little).

Friday 4 May 2007

Picture Frames

Frames

The idea for this came from a similar idea that I had seen somewhere else at some point in the past. I rigged up a white sheet as a background and got each person to sit on the sheet (one at a time) holding a framed picture (borrowed from various walls around the house!). The actual picture in the frame that they were holding didn't matter. Once all the individual photos were taken, I opened them in Photoshop - converted them to black & white (primarily by converting to CMYK and using the K channel mixed with a little of some of the other channels) - and then used "free transform" to transform then so that they fitted into the frame that the other person was holding. I also had to do some erasing of the background here and there to touch things up.

If you've got kids (or know someone who has), then why not give this idea a try yourself - it's not particularly difficult, fun and is a bit different from just a straight family shot.

Tuesday 1 May 2007

Wedding Book

I don't think that I would really want to be a professional wedding photographer - too stressful and repetitive, I think - however, I do quite enjoy it when I get roped into taking wedding photos for someone once in a while. In the past, I have always had to work with film, so I was quite excited when the opportunity came along for me to cover a wedding digitally for the first time. In particular, I wanted to put together a photo book with the shots from the wedding. The result is shown below - each image shows facing pages from the final book. The bride and groom were happy with it at least :)

I used a Sigma 24-70 f2.8 lens and a mixture of available light and bounced flash (except during the actual service when I was not allowed to use a flash so used available light only).

[Note that these photos link to my old Flickr ID - there were too many of them for me to get round to moving them all to the new "Delight in Light" account.]

page01

page01

page01

page01

page01

page01

page01

page01

page01

page01

page01

page01

page01

page01

page01

page01

page01

page01

page01

page01

page01

page01

page01

page01

page01

Tuesday 13 March 2007

The Claw

Claw Protecting Treasure

This is a photo of the left-overs of a crab that my brother-in-law and I had (rather unsuccessfully) cooked on the bbq. I noticed that the left-over legs looked like claws so I decided to try to capture a photo that looked like some sort of monster's arm reaching out for something. The "something" was a plastic bouncy ball that I found lying around the house; the "arm" was miscellaneous pieces of left-overs strategically placed behind the legs.

To get the photo I found an old piece of hardboard and drilled a hole in it a little smaller than the ball. This allowed me to light the ball from underneath to give it the "mysterious glow" effect. The light underneath was a bare flash with barn-doors (so that it only lit the ball and didn't spill out around the sides of the board). The "claw" itself was lit with another flash in a home-made soft-box behind and to the right (as you look at it). I positioned the soft box a couple of metres away so that the light wasn't too soft. I used a Mamiya medium-format camera with Velvia transparency film and a flash meter to set the exposure for the two flashes. I subsequently scanned the transparency and gave it some slight tweaks in Photoshop (curves and that sort of thing) to give it a bit more punch.

I'm not really convinced that the hardboard and shavings really worked, but, other than that, I was pleased with how it turned out - particularly as that was still in the days when you didn't get to see the photo instantly to check the effect, but had to wait for it to come back from being processed!

Monday 12 March 2007

Victoria Falls at Sunrise

Victoria Falls at Sunrise

I took this photo several years ago when I was visiting Victoria Falls (on the Zambezi River in Africa between Zimbabwe and Zambia) on honeymoon with my wife. It was taken with a 35mm film camera (remember those??) - the digital version here was scanned from a 6x4" print on a flat-bed scanner

Whilst visiting Vic Falls, I (obviously) took quite a few photos (not as many as I probably would in these days of digital, of course) but most of the were what you might call "record" shots - I don't know if it is because I had seen so many other photos of the Falls in the past (I used to live in Zimbabwe), but I was finding it difficult to feel inspired about capturing something that I felt was at all interesting or that captured anything of the feel of the place.

In the end, based on the well known fact that the light makes or breaks landscape photos, I decided that the best plan would be to try to get a shot at sunrise (sunset, which would have been easier, didn't really work because the light direction didn't seem to be working).

I have to admit that it was a bit of a challenge to drag myself and my wife out of our nice warm bed early enough to get there in time, but the light (and, actually, the whole experience) was absolutely fantastic - if you are ever anywhere like that, then I strongly recommend making the effort to get up and see the sunrise. Not only did I get some photos that were much more interesting that the others I had taken, but also a memory that both of us treasure - and one that we would have missed if it weren't for that desire to get out there and capture that more interesting photo.

In terms of technique, by the way, there wasn't really anything difficult about this shot - I'm reasonably sure that I used my tripod, and I determined the exposure to use by taking spot readings from the dark and light areas on the scene and then choosing an overall exposure that I thought would give a reasonable overall exposure.