== Love Photography == Delight in Light ==

Saturday 23 November 2013

Photo 101 - Lesson 7 - Change Your Position

In lesson 2 we introduced the idea of "composition" (how things are arranged in the photo). Since then we have had a number of lessons that are all really to do with that same topic. We have looked at moving closer to the subject (arranging your subject so that it is bigger in the photo than it would have been); we have looked at simplifying (changing the arrangement of the photo by removing distractions); we have looked at arranging the photo so that it includes a natural frame, and we have looked at arranging lines or objects so that they seem to draw you into the picture.

Now, this may sound obvious, but, as we have already seen, in many (maybe most) cases, the key to changing your composition is to change the position of your camera. So - in this lesson I want to you to think about just that: changing your camera's position.

There are basically four changes of position that you can consider. Of course not all of them will be possible in all cases, but try to remember to at least consider each of them. They are:

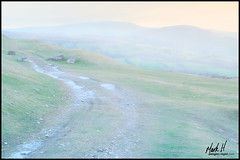
  • Elevation - You can move your camera higher or lower - you could choose a very low, slightly low, medium, slightly high, or very high viewpoint. You could even (in some cases) position your camera directly above or directly below the subject.
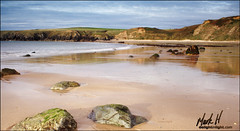
  • Distance - You can more closer or further from the subject - we previously talked about moving closer, but sometimes moving further away actually works better.
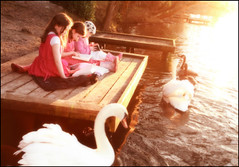
  • Direction - You can move around to one of the sides or to the back of the subject rather than simply photographing it from the front.
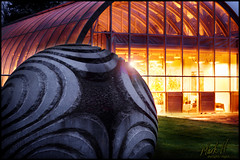
  • Camera Rotation - Instead of holding your camera horizontally (level with the floor - in what is normally called "landscape" orientation), you could hold it vertically (on its side in "portrait" orientation). You could even try holding it an an angle.

All these options are illustrated in this diagram:

So your homework today is simply to concentrate on trying different viewpoints. Find a few subjects and take a series of photos of it from multiple different viewpoints. Remember to think about all four of the different movements. And also remember to combine them in different ways - close up, low down and with you camera in portrait orientation; far away, high up, from the side; and so on. Then think about which ones worked best. Oh - and don't forget to have fun!

Tuesday 17 September 2013

Photo 101 - Lesson 6 - Walk This Way: Near and Far

In the last lesson we talked about creating a "frame within a frame" - including something in your picture that creates a border around the edges. Normally (although, not always) you do this by including something (like a tree, an archway, or something like that) that is closer to the camera than the actual subject.

In this lesson I want to continue along a similar theme - including things in your photo that are different distances from the camera.

One problem with photos is that they are 2-dimensional. They are flat. They don't have any depth - if you look at a photo from the side, all there is is a single line. The real world is not like that. There is depth to it. The challenge is to get the photo to look like it has depth too. There are many aspects to this, but one important way of doing it is to include objects at different distances within your photo so that people feel like they are being drawn into the picture.

You can achieve this by either including individual objects in the photo that are different distances away from the camera or by having some kind of line (like a road, path, wall, etc.) that starts near the camera and runs towards the distance (this is called a "leading line" because it feels like it is leading you into the picture). Or, of course, you could use a combination of both.

Here are some examples:

Whistling Sands Beach

Mountain Mist

Princess Paradise

Millennium Seed Bank

In all of these photos there are things that are at clearly different distances from that camera - and these give the photos a feeling of depth.

So - your homework this time is to give this a try. Take several pairs of photos: in the first photo in each pair, avoid having something in the foreground; in the second photo, include an object or a line that "draws people in".

Once you've done that, have a look at the resulting photos and think about which ones you like more. Consider questions like these:

  • Did having something in the foreground improve the photos?
  • Which pair(s) benefited most from this sense of depth?
  • Were they any where including something in for foreground actually made it worse?
  • Did lines or individual objects seem to work best?

Don't rush it, but once you're done, don't forget to come back for lesson 7 :)

Sunday 24 March 2013

Photo 101 - Lesson 5 - Frame Within a Frame

Every picture has some kind of boundary, and how we arrange things within that boundary is called the composition or framing. Back in lesson 2 we talked about the fact that when you take a photo you should try to compose (or frame) things in an interesting way.

However, in this lesson I want to talk about a different type of "frame"...

Have a look at this picture:

Sunday Morning

The tree and bits of bush around the edges create kind of border (or frame) around the main part of the picture. This gives the picture more of a feeling of depth - as if you are secretly looking out at it from inside the depth of the forest. It adds to the mystery and interest of the picture.

Here's another example:

A Corner of Wakehurst

Here again, I have used some trees in the foreground to create a natural "frame" for the main part of the picture. In this example, the foreground trees are not even in focus, but that, I think, only adds to the feeling that we are emerging out of the trees and discovering the gardens beyond.

So, for today's lesson, I would like you to go and take some pictures that include some kind of "frame" within the picture itself. It could be trees as in these two examples, or it could be something else - a doorway, a window, the end of a tunnel, the space between some buildings, etc. etc. - anything that allows you to take a photo that includes a "frame within the frame". Try to be as imaginative and creative as possible in your choice of frame.

You know the drill now - have a look at the results of your efforts and save the best ones in your folder. Don't forget to also spend some time thinking about why you like those ones best.

Once you're done, don't forget to come back for Lesson 6 :) - see you then!