== Love Photography == Delight in Light ==

Wednesday 5 December 2012

Photo 101 - Lesson 4 - Keep It Simple

Last time, in lesson 3, we talked about moving closer. A large part of why that often leads to better photos, is that it helps to make sure that there are no distractions in the picture. If you move closer, you are much less likely to have all sorts of other things competing for attention with the main subject of the photo. The photo is much less likely to look all cluttered and untidy.

So, this time, think about that general principle. "How can I stop this picture from looking cluttered and untidy?"

There are, actually, many ways of doing that. But I want to concentrate on one other specific approach that is frequently helpful (and possible!) -- find a nice, uncluttered background.

When you take a photo, think about what's going on around and behind your subject. If there are lots of different things going on in those areas, then they will be likely to distract people from your main subject. So try to find a way of positioning your subject and/or yourself so that the background is as plain and uncluttered as possible.

The easiest way to do this is to find an area of your surroundings that is relatively plain and undistracting. A nice, plain wall, for example, is often a good choice. But it also may be something less obvious than a plain wall. Look at this picture - it taken at the London Aquarium where there's not really a lot of excess space (or plain walls), but I still managed to frame the picture so that there was only blue water in the background - thereby eliminating distractions:

Ocean Flight

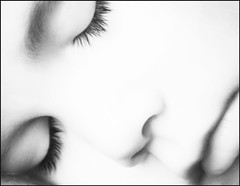
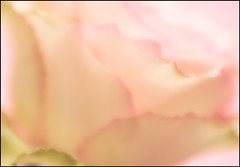
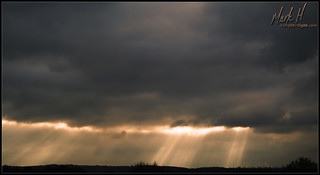
If there isn't anything around you that offers a suitable background, what about above or below you? Many times you can use the floor or ceiling/sky as a background - and potentially get the added benefit of an unusual viewpoint as well. Here's some examples of where I've used those approaches:

Baby Smile   My Little Paper Aeroplane

Ok - now it's your turn. Try to take a bunch of photos with nice clean backgrounds. Find a wall; shoot from low down with the sky as a background; shoot from high up with the floor as a backbround; and so on. If necessary, consider moving things that are getting in the way. Or think about making your own background with a bed-sheet (neatly ironed!) or some paper/card. That approach is particularly useful when photographing small objects like flowers, etc. where this is more practical to achieve - setting up your own background for a full length portrait of a person can be rather challenging, but it's usually not too difficult to prop a piece of card behing a flower you are trying to photograph.

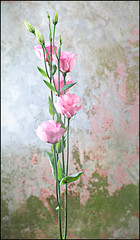
Remember too that the background doesn't necessarily have to be completely plain. Sometimes a background with a bit of a pattern or texture can also work well. Like this one, for example:

Pink Lizzy

As usual save the best ones in your course folder before you move on to Lesson 5.

Wednesday 14 November 2012

Photo 101 - Lesson 3 - Move Closer

The next thing that I want to talk about is again not something that is difficult to do. It's simply this: Move closer to your subject.

I'm not really sure why this is, but beginner photographers often have a tendency to include lots of unnecessary space around their subjects. Now, it is true that there are times when it is a good idea to have the subject (e.g. a person) quite small in the picture. However, more often than not, the reason someone has left extra space around their subject is that they haven't really thought about making it larger.

So, for your lesson this time, I want you to practice taking photos where the subject completely fills the frame. Zoom in or move closer so that there is nothing in your picture except the subject itself. Here's some examples of the kind of thing that I mean:

Sleeping Child

The Warmth of the Rose

Try this with a variety of different kinds of subjects if you can, and don't limit yourself to just one shot of each subject - experiment with trying to fill the picture with your subject if different ways. If it's a person, for example, try different angles, or take photos of the person's hands or feet (rather than just their face), etc.

Once you've done that, take another set of photos where the subject doesn't completely fill the frame, but does almost fill the frame. Something like this, maybe:

I Can See You!

Again, you may like to save your favourites from these exercises in your lesson folder so that you can refer back to them later.

The main thing, in all of this, is to try to get yourself used to thinking about filling the picture with your subject. Get used to asking yourself how large your subject should be. That way, if you do decide do make your subject smaller in the frame, you will have done it intentionally - not just because you didn't think about whether it should be bigger.

Have fun, and see you next time for Lesson 4 :)

Sunday 21 October 2012

Photo 101 - Lesson 2 - Compose, Don't Shoot

Welcome to Lesson 2 - in this lesson I want us to start thinking about composition. "Composition" just means "how things are arranged in your photograph".

The word "shoot" (or "shot", etc.) is often used to mean "take a photograph" - for example people may say things like, "I'm going to see if I can get a nice shot of that view" or "My friend has asked me to shoot his wedding".

However, there is an important difference between photography and shooting - well, I mean in addition to the fact that you are not firing bullets around! The difference is that with shooting, you are trying to keep the target (subject) in the middle of the sights so you hit it. Getting it right in the middle is normally considered a good thing. With photography, getting something right in the middle of the photo usually isn't particularly the best option.

Many people, when taking a photograph, point the camera so that the thing they are taking the photo of - the subject - is bang in the centre of the photo. Usually, however, the photo will look much more interesting if you keep the subject away from the middle of the photo.

So, what I want you do to this time is to take some photographs (you can choose any suitable subjects), and concentrate on composing the shot in such a way that you keep the subject away from the middle. If it's a person, for example, try to have their head to one side or the other and either above or below the centre line of the picture. If you are taking a landscape, put the horizon line somewhat above or below the centre. And so on.

For example, in this photo I had the horizon only just above the bottom of the picture:

Silver Lining

Try some pictures where you compose important points well away from the centre (like that example) and also try some where you have them only a little way away from the centre.

The important thing is to remember to compose your photo - be deliberate about where you put the things in the picture - don't just point the camera at something and take a "pot-shot"!

Again, you can copy some of the best ones into your course folder and make some notes about what went well or could be improved. In particular, think about whether or not your choice of placement made the picture better or worse. If worse, would some other placement/composition have worked better?

Have fun, experiment lots, and get into the habit of thinking about composing instead of shooting. Then we'll see you back again next time for Lesson 3 :)

Friday 19 October 2012

Photo 101 - Lesson 1 - Getting Started

Ok - let's get started.

Set Up Your Computer

What I would like you to do first is to set up your computer so you're ready for this course - nothing particularly difficult, but it would be good to have a place where you can store all the photos and other things you will be creating as you progress through the various lessons.

So, in a convenient place in your computer, create a folder for the course - you could call it "Delight in Light Photo 101" or something like that. Within that you will create sub-folders for the different lessons - this is Lesson 1, so create a folder called - um, say, "Lesson 1" maybe?

Take Some Photos

Right - I'm sure you're keen to get started actually taking some photos, so let's do that now. Go and take some photos of each of the things listed below (or at least as many as possible). Don't rush it - try to do your best to take some really nice photos. There's no particular number of photos that you need to take, but, once you've finished taking them, I want you to select 2 or 3 of the best ones of each and put those into your Lesson 1 folder.

Here's the list of subjects that I want you to cover:

  • A person (i.e. a portrait)
  • A group of people (preferably have 5 or more people in the group)
  • A landscape (i.e. a view of the countryside, a park, a city scene, or something like that)
  • A flower
  • People engaged in some kind of sporting activity or something similar that involves a reasonable amount of movement and action.

Think About Your Photos

Done? Great.

Now, create a blank document in your Lesson 1 folder. Look at the photos you selected and think about what you like about each of them. What worked out well? Also think about what you wish was better about each of them. Maybe you could get someone else to give you their thoughts too. Note the key points/thoughts about each photo in your document so that you can look back at them at a later date.

Great - that's Lesson 1 done - we'll see you next time for Lesson 2 :)

Photo101 - Basic Photography Course - Introduction

One of my daughters is keen to learn more about photography so I've started the process of putting together a bit of a "course" for her. I thought I would post the lessons on this blog so that they are available to anyone else who may be interested. If you are one of those people, welcome :)

To follow along, it will be best if you have access to a digital SLR type camera or at least to a camera that allows you to manually control exposure settings and focus. However, even if you only have access to a basic, fully-automatic camera you should still be able to gain something out of what I'm planning.

Now, if you're ready, let's get started with Lesson 1 >>.

Tuesday 6 March 2012

Quick, Simple Photoshop Fix for Blotchy Skin

Here's a quick and simple Photoshop tip for fixing red patchy / blotchy skin in Photoshop:

Red Patchy Skin Quick Fix

Here's how you do it:

  1. Create a new "Channel Mixer" adjustment layer above your image layer
  2. Set the various settings in the Channel Mixer dialogue box to the following values:
    • Output Channel: Gray
    • Red: +70%
    • Green: -10%
    • Blue: +40%
    • Constant: 0%
    • Monochrome checked
  3. Click "OK" to accept
  4. Set the blend mode of your adjustment layer to "Luminosity"
  5. Use black & white paint on the layer mask that should have been created with your adjustment layer to restrict the effect to the relevant parts of the image (for example, you will probably not want this effect to be applied to the person's lips!)

Of course the result is not likely to be perfect, and you will probably have to invoke other retouching techniques, but I found that it did make a remarkable improvement with very little effort (once I'd figured out the technique, anyway!).

Good luck - hope this helps :)