
Hopefully by now you are getting the hang of thinking about composition when you take your photos. Maybe you're even getting a bit sick of that topic.
But, sorry, no apology. Oh, hang on, that is an apology! Oh well - what I'm trying to say is, it was deliberate. I've concentrated on composition for this long for a reason.
The word "photography" comes from two Greek words that together literally mean "drawing with light". Concentrating on composition is a good way to start to train yourself to actually think about the fact that what you are doing is creating a work of art. You're drawing. You're painting. You are no longer just taking a snapshot.
But actually, composition is only part of what makes the difference.
The main thing that makes a photo stand out from ordinary ones is what I think is best called "the use of style"...
I'll come back to that, but first, let me clarify what I mean by "style".
One of the definitions of style in the Oxford Dictionary is "A distinctive appearance, typically determined by the principles according to which something is designed". That's the kind of "style" that I'm talking about.
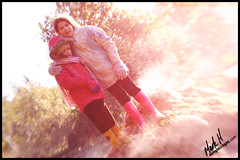
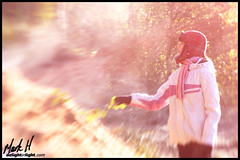
Let me show you two sets of photos...
Set 1:
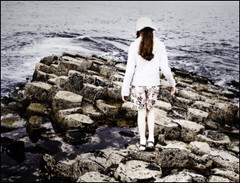
Set 2:
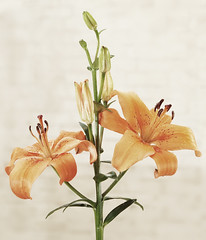
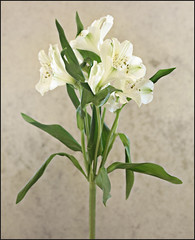
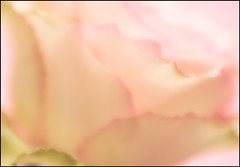
In both sets the first two photos have a similar style. The third picture in each set, on the other hand, has a very different style. That's what I mean by style - the attributes of a photo that give it a certain "distinctive appearance".
Now, you've already learned a lot about composition. Composition is one of those attributes that contributes to a photo's style.
But, of course, there's much more to it than just composition. Here's a list of just some of the things that can influence a photo's style:
- Composition
- Use of colour
- Type of subject
- How any people are posed
- What is/isn't in focus
- How sharp the things in focus are
- Appearance of movement
- Overall tone (how bright/dark the photo is)
- Use of lighting
- Computer processing effects
- Type of lens used
- Amount of contrast
- Type of background
- Whether it's a literal view of the thing or more of an abstract design
- etc., etc.
"Ok," I hear you say, "that's all very nice, but I'm not actually interested in taking sets of photos just so they can look like they all have the same style!"
Fair enough. But remember what I said at the beginning - the way to make your photos stand out is to use style effectively. Almost always, when you see a really good photograph you will be able to recognise that it has a definite style. That doesn't necessarily mean that you could immediately explain what that style is or find another picture that has a similar style. But if you did compare it to other pictures, it would be easy to say whether or not they had a similar style. And it's that style that makes the photo stand out from just any old snapshot.
Now, simply having a definite style is not enough. After all, certain styles may make certain photos turn out as disasters. If you were a wedding photographer, for example, you would probably find that most brides are not that keen on you using a style that resembles a horror movie poster. So it can't just be any old style - it has to be the right style.
In fact, you could say that most snapshots already have a style - but rather than having a particularly interesting or attractive style, they just slip unthinkingly into having what we might call the "snapshot style", which includes characteristics like these:
- No particular composition techniques like frame in a frame or anything
- Main subject positioned roughly in the middle of the picture
- Main subject neither particularly big nor particularly small
- Mish-mash of generally fairly dull colours
- Everyday subjects (such as people doing ordinary things or common landmarks)
- Not particularly flattering poses
- Limited sharpness and no particular contrast in focus between the subject and background
- Broad range of light/dark tones without particularly notable blacks or striking highlights
- Over-exposed, washed-out-looking skies
- Cluttered background
- Taken using a standard lens
- Taken from normal eye height
- and so on...
Now there's no harm in taking snapshots - if that's what they are - a quick record of something you want to remember - fine.
But let's face it - giving a photo a "snapshot style" is not really that likely to yield a particularly notable work of art.
Rather, the way to get a work of art is to give the photo a clear style that works really well for the "artistic vision" you are aiming to achieve. And, typically, that style will differ noticeably from the "snapshot style" in at least one (but very probably several) ways.
When you started to think actively about composition, what you were doing was starting to give your photos a style that differs from the "snapshot style" in at least that one way. But, ultimately, if you want to create a work of art, you will almost certainly need to depart from our old friend Mr Snapshot in other ways as well.
So, to really create a work of art instead of just taking a snapshot, you need to:
If you can do all that, you will have your work of art.
If you can do it consistently, you will be a true photographer. (Just getting lucky once in a while, without really understanding why or how you succeeded, doesn't count.)
Of course, this is a journey that doesn't really have a final destination because there are so many different styles and situations that you will never master them all. But at least make sure you are travelling in the right direction.
The start of that journey from here, then, is to begin to develop an appreciation of different styles and how they differ from our "snapshot style". Then you can start to learn the practicalities, techniques, etc. for actually creating them. Finally you can practice applying them in ways that allow you to create your very own masterpieces.
So, here's what I want you to do for your homework for this lesson...
- Find a bunch of photographs that you really like. That is, ones that you like for how they look - I'm not talking about a snapshot of your first pet or something - however fond you are of that old photo! I'm talking about ones that make you say, "wow, that's an awesome photo!" Feel free to look in books, magazines, online, wherever. I don't want to be too specific regarding how many you should find, but I'd say that around 20 is probably the minimum. Try to choose ones of various different styles. And don't settle for examples that are just "nice" - those ones aren't good enough. Find ones that really inspire you. Ones that make you think, "I would never be able to take a photo that's as good as that!"
- Create a document, and for each photo:
- If possible insert a thumbnail of the photo and a link to the full version. If it's from a magazine, you could maybe cut it out. If it's from a book, it's probably best to just make a note of the page number...
- Note what you like about the photo - what struck you about it and made you select it?
- Think about, and write down, how the style of that photo differs from the "snapshot style". How has this move away from "snapshot style" contributed to what you like about the photo? There will almost certainly be several things that are relevant, so make a note of them all. Don't rush this. Don't just stop at the first one or two obvious things. Maybe look back at the list above as a prompt, but remember that there could be other things as well that are influencing the style. Don't worry, by the way, at least at this stage, if you don't know how the photographer achieved some aspect of the style - the point of this exercise is to notice how the photographer used style, not necessarily how it was achieved.
- It may also be worth, at least for some of the photos, thinking about some of the "snapshot style" components that haven't changed. Why was it ok for those factors to remain unchanged in this instance? Would the photo have been even better if those had been changed in some way as well?
- Notwithstanding what I said above, give a moments thought to how the style was achieved - the actual techniques used. Don't worry too much about this bit, and don't spend too much time on it, but give it a shot. Since you are (I assume) just starting out in photography, there will be many effects that you won't know how to achieve. But there will probably be at least some aspects of the technique that you may be able to work out. For example, if composition is an important component of the style, then you should be able to work out how the photographer placed/oriented the camera and/or subject in order to achieve that composition. Note any particular techniques that you can work out.
- Once you've finished, go through all the photos again. Now that you are in the swing of it, are there some things you didn't notice the first time round? Maybe talk through them with someone and see if they notice anything you didn't.
- Once you've done that, you can consider yourself to have finished your homework. But don't stop there. Try to get into the habit of doing this whenever you see a photo that you particularly like. Why did it stand out? How does it's style differ from "snapshot style"? Train yourself into this mindset.
And, of course, have fun! :)
No comments:
Post a Comment