== Love Photography == Delight in Light ==

Sunday, 21 October 2012

Photo 101 - Lesson 2 - Compose, Don't Shoot

Welcome to Lesson 2 - in this lesson I want us to start thinking about composition. "Composition" just means "how things are arranged in your photograph".

The word "shoot" (or "shot", etc.) is often used to mean "take a photograph" - for example people may say things like, "I'm going to see if I can get a nice shot of that view" or "My friend has asked me to shoot his wedding".

However, there is an important difference between photography and shooting - well, I mean in addition to the fact that you are not firing bullets around! The difference is that with shooting, you are trying to keep the target (subject) in the middle of the sights so you hit it. Getting it right in the middle is normally considered a good thing. With photography, getting something right in the middle of the photo usually isn't particularly the best option.

Many people, when taking a photograph, point the camera so that the thing they are taking the photo of - the subject - is bang in the centre of the photo. Usually, however, the photo will look much more interesting if you keep the subject away from the middle of the photo.

So, what I want you do to this time is to take some photographs (you can choose any suitable subjects), and concentrate on composing the shot in such a way that you keep the subject away from the middle. If it's a person, for example, try to have their head to one side or the other and either above or below the centre line of the picture. If you are taking a landscape, put the horizon line somewhat above or below the centre. And so on.

For example, in this photo I had the horizon only just above the bottom of the picture:
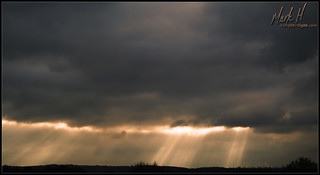
Silver Lining

Try some pictures where you compose important points well away from the centre (like that example) and also try some where you have them only a little way away from the centre.

The important thing is to remember to compose your photo - be deliberate about where you put the things in the picture - don't just point the camera at something and take a "pot-shot"!

Again, you can copy some of the best ones into your course folder and make some notes about what went well or could be improved. In particular, think about whether or not your choice of placement made the picture better or worse. If worse, would some other placement/composition have worked better?

Have fun, experiment lots, and get into the habit of thinking about composing instead of shooting. Then we'll see you back again next time for Lesson 3 :)

Friday, 19 October 2012

Photo 101 - Lesson 1 - Getting Started

Ok - let's get started.

Set Up Your Computer

What I would like you to do first is to set up your computer so you're ready for this course - nothing particularly difficult, but it would be good to have a place where you can store all the photos and other things you will be creating as you progress through the various lessons.

So, in a convenient place in your computer, create a folder for the course - you could call it "Delight in Light Photo 101" or something like that. Within that you will create sub-folders for the different lessons - this is Lesson 1, so create a folder called - um, say, "Lesson 1" maybe?

Take Some Photos

Right - I'm sure you're keen to get started actually taking some photos, so let's do that now. Go and take some photos of each of the things listed below (or at least as many as possible). Don't rush it - try to do your best to take some really nice photos. There's no particular number of photos that you need to take, but, once you've finished taking them, I want you to select 2 or 3 of the best ones of each and put those into your Lesson 1 folder.

Here's the list of subjects that I want you to cover:

  • A person (i.e. a portrait)
  • A group of people (preferably have 5 or more people in the group)
  • A landscape (i.e. a view of the countryside, a park, a city scene, or something like that)
  • A flower
  • People engaged in some kind of sporting activity or something similar that involves a reasonable amount of movement and action.

Think About Your Photos

Done? Great.

Now, create a blank document in your Lesson 1 folder. Look at the photos you selected and think about what you like about each of them. What worked out well? Also think about what you wish was better about each of them. Maybe you could get someone else to give you their thoughts too. Note the key points/thoughts about each photo in your document so that you can look back at them at a later date.

Great - that's Lesson 1 done - we'll see you next time for Lesson 2 :)

Photo101 - Basic Photography Course - Introduction

One of my daughters is keen to learn more about photography so I've started the process of putting together a bit of a "course" for her. I thought I would post the lessons on this blog so that they are available to anyone else who may be interested. If you are one of those people, welcome :)

To follow along, it will be best if you have access to a digital SLR type camera or at least to a camera that allows you to manually control exposure settings and focus. However, even if you only have access to a basic, fully-automatic camera you should still be able to gain something out of what I'm planning.

Now, if you're ready, let's get started with Lesson 1 >>.