Welcome to Lesson 2 - in this lesson I want us to start thinking about composition. "Composition" just means "how things are arranged in your photograph".
The word "shoot" (or "shot", etc.) is often used to mean "take a photograph" - for example people may say things like, "I'm going to see if I can get a nice shot of that view" or "My friend has asked me to shoot his wedding".
However, there is an important difference between photography and shooting - well, I mean in addition to the fact that you are not firing bullets around! The difference is that with shooting, you are trying to keep the target (subject) in the middle of the sights so you hit it. Getting it right in the middle is normally considered a good thing. With photography, getting something right in the middle of the photo usually isn't particularly the best option.
Many people, when taking a photograph, point the camera so that the thing they are taking the photo of - the subject - is bang in the centre of the photo. Usually, however, the photo will look much more interesting if you keep the subject away from the middle of the photo.
So, what I want you do to this time is to take some photographs (you can choose any suitable subjects), and concentrate on composing the shot in such a way that you keep the subject away from the middle. If it's a person, for example, try to have their head to one side or the other and either above or below the centre line of the picture. If you are taking a landscape, put the horizon line somewhat above or below the centre. And so on.
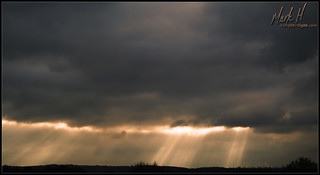
For example, in this photo I had the horizon only just above the bottom of the picture:

Try some pictures where you compose important points well away from the centre (like that example) and also try some where you have them only a little way away from the centre.
The important thing is to remember to compose your photo - be deliberate about where you put the things in the picture - don't just point the camera at something and take a "pot-shot"!
Again, you can copy some of the best ones into your course folder and make some notes about what went well or could be improved. In particular, think about whether or not your choice of placement made the picture better or worse. If worse, would some other placement/composition have worked better?
Have fun, experiment lots, and get into the habit of thinking about composing instead of shooting. Then we'll see you back again next time for Lesson 3 :)

No comments:
Post a Comment