
Every picture has some kind of boundary, and how we arrange things within that boundary is called the composition or framing. Back in lesson 2 we talked about the fact that when you take a photo you should try to compose (or frame) things in an interesting way.
However, in this lesson I want to talk about a different type of "frame"...
Have a look at this picture:
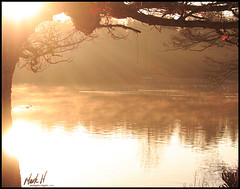
The tree and bits of bush around the edges create kind of border (or frame) around the main part of the picture. This gives the picture more of a feeling of depth - as if you are secretly looking out at it from inside the depth of the forest. It adds to the mystery and interest of the picture.
Here's another example:
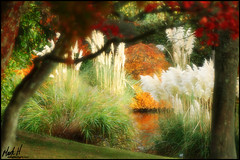
Here again, I have used some trees in the foreground to create a natural "frame" for the main part of the picture. In this example, the foreground trees are not even in focus, but that, I think, only adds to the feeling that we are emerging out of the trees and discovering the gardens beyond.
So, for today's lesson, I would like you to go and take some pictures that include some kind of "frame" within the picture itself. It could be trees as in these two examples, or it could be something else - a doorway, a window, the end of a tunnel, the space between some buildings, etc. etc. - anything that allows you to take a photo that includes a "frame within the frame". Try to be as imaginative and creative as possible in your choice of frame.
You know the drill now - have a look at the results of your efforts and save the best ones in your folder. Don't forget to also spend some time thinking about why you like those ones best.
Once you're done, don't forget to come back for Lesson 6 :) - see you then!
No comments:
Post a Comment